A few days ago, Dynamsoft Labs released Barcode Reader SDK for Linux. The SDK package provides two shared libraries for C/C++ programming. If you want to write code with high-level programming languages such as Java, you need to create a wrapper. In this post, I will illustrate how to build a simple Java barcode reader on Ubuntu with JNI (Java Native Interface) from scratch.
Installing Dynamsoft Barcode Reader for Linux
To download Dynamsoft Barcode Reader SDK, you can visit the overview page and click v4.0.0-pre-alpha.tar.gz.
Extract the package with the command:
tar -xzf dbr-4.0.0-pre-alpha.tar.gz
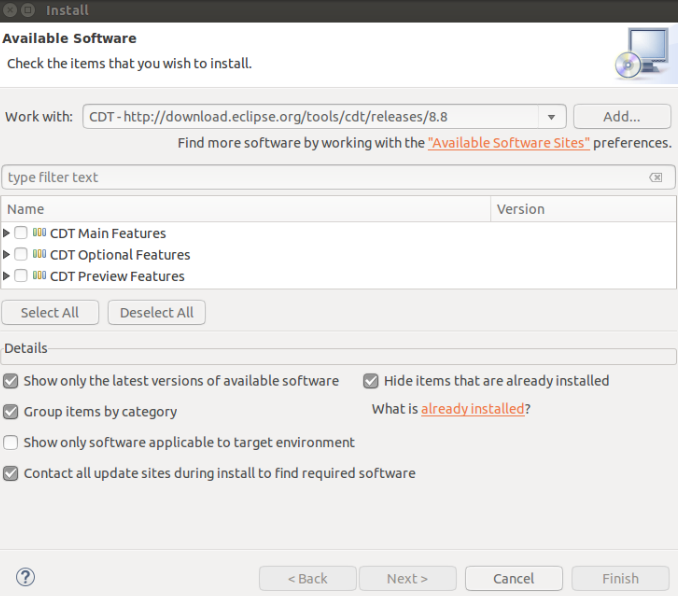
Installing Eclipse and CDT for Ubuntu
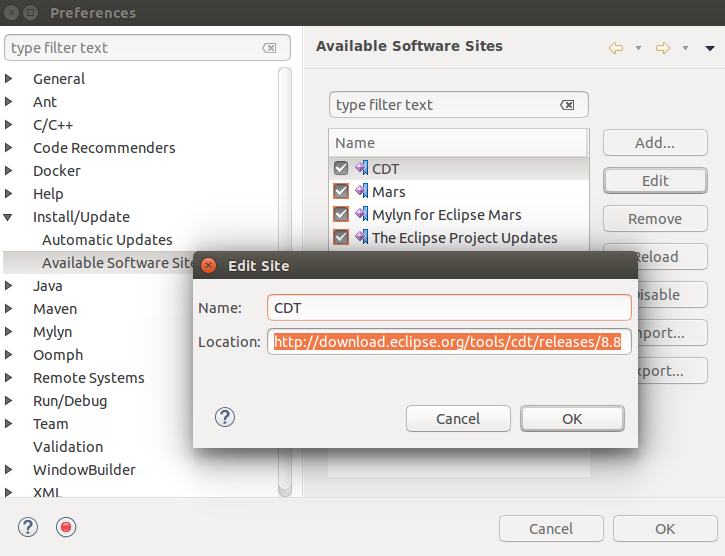
To conveniently write Java and C/C++ code on Linux, I prefer using Eclipse and CDT. You can navigate Window > Preferences > Install/Update > Available Software Sites to add CDT URL.
Navigate Help > Install New Software > Work with to install CDT.
How to Implement Java Barcode Reader on Ubuntu with JNI
Create a Class DBRJNI with some native methods:
public class DBRJNI {

                static {

                                System.loadLibrary("dbr");

                }

                public native int initializeLicense(String license);

                public native ArrayList<BarcodeResult> readBarcode(String fileName);

}
Create a folder jni for writing C/C++ code in your project root directory. Generate a header file corresponding to the Class DBRJNI with the following command:
javah -o DBRJNI.h -classpath ../bin com.dynamsoft.DBRJNI
You will see the following unresolved issues:

To solve the problem, open project properties and add the Java include path (/usr/lib/jvm/java-7-openjdk-amd64/include) to Preprocessor Include Paths.

Create DBRJNI.cpp to add function implementations:
JNIEXPORT jint JNICALL Java_com_dynamsoft_DBRJNI_initializeLicense(JNIEnv *env,
jobject obj, jstring license)
{
const char *pszLicense = env->GetStringUTFChars(license, 0);
int ret = DBR_InitLicense(pszLicense);
// release license native string
env->ReleaseStringUTFChars(license, pszLicense);
return ret;
}
JNIEXPORT jobject JNICALL Java_com_dynamsoft_DBRJNI_readBarcode(JNIEnv *env,
jobject obj, jstring fileName)
{
const char *pszFileName = env->GetStringUTFChars(fileName, 0);
__int64 llFormat = OneD | QR_CODE | PDF417 | DATAMATRIX;
int iMaxCount = 0x7FFFFFFF;
ReaderOptions ro = { 0 };
ro.llBarcodeFormat = llFormat;
ro.iMaxBarcodesNumPerPage = iMaxCount;
pBarcodeResultArray paryResult = NULL;
int iRet = DBR_DecodeFile(pszFileName, &ro, &paryResult);
if (iRet != DBR_OK) {
printf("Failed to read barcode: %s\n", DBR_GetErrorString(iRet));
return NULL;
}
if (paryResult->iBarcodeCount == 0)
{
printf("No barcode found");
DBR_FreeBarcodeResults(&paryResult);
return 0;
}
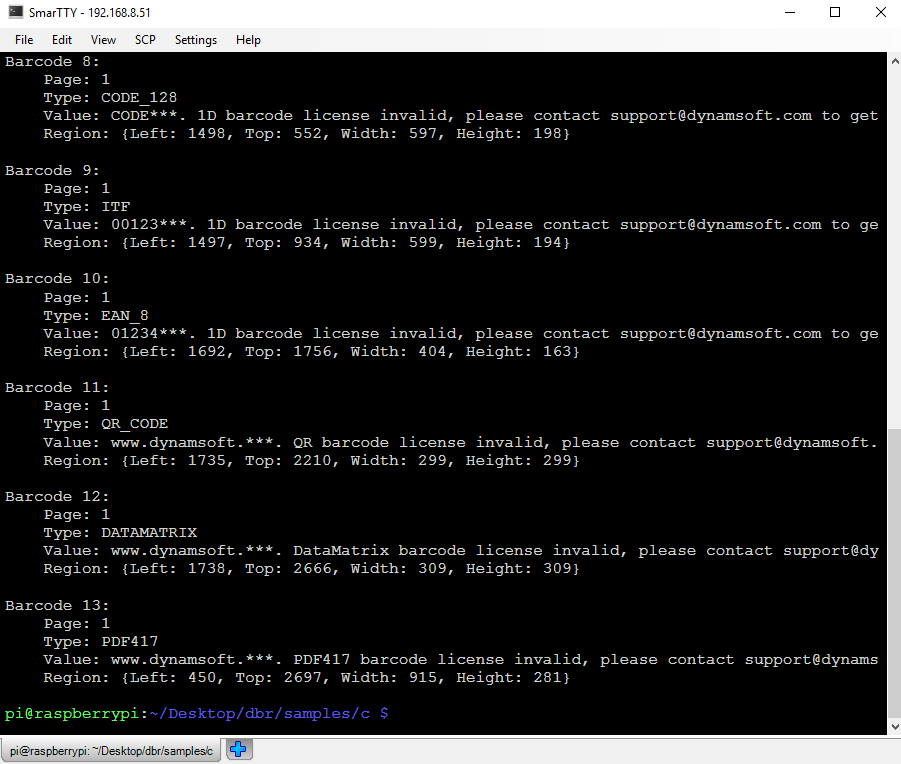
for (int iIndex = 0; iIndex < paryResult->iBarcodeCount; iIndex++)
{
printf("Barcode %d:\n", iIndex + 1);
printf(" Page: %d\n", paryResult->ppBarcodes[iIndex]->iPageNum);
printf(" Type: %s\n", GetFormatStr(paryResult->ppBarcodes[iIndex]->llFormat));
printf(" Value: %s\n", paryResult->ppBarcodes[iIndex]->pBarcodeData);
printf(" Region: {Left: %d, Top: %d, Width: %d, Height: %d}\n\n",
paryResult->ppBarcodes[iIndex]->iLeft, paryResult->ppBarcodes[iIndex]->iTop,
paryResult->ppBarcodes[iIndex]->iWidth, paryResult->ppBarcodes[iIndex]->iHeight);
}
DBR_FreeBarcodeResults(&paryResult);
// release filename native string
env->ReleaseStringUTFChars(fileName, pszFileName);
return NULL;
}
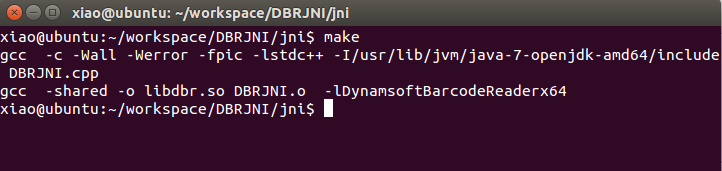
Create a makefile:
CC=gcc
CCFLAGS=-c -Wall -Werror -fpic -lstdc++
JNI_INCLUDE=/usr/lib/jvm/java-7-openjdk-amd64/include
CLASS_PATH=../bin
#DBRLIB_PATH=~/Dynamsoft/BarcodeReader4.0/Redist
#LDFLAGS=-L$(DBRLIB_PATH) -Wl,-rpath=$(DBRLIB_PATH)

ifeq ($(shell getconf LONG_BIT), 32)
	DBRLIB=-lDynamsoftBarcodeReaderx86
	LIBNAME=libDynamsoftBarcodeReaderx86.so
else
	DBRLIB=-lDynamsoftBarcodeReaderx64
	LIBNAME=libDynamsoftBarcodeReaderx64.so
endif

TARGET=libdbr.so
OBJECT=DBRJNI.o
SOURCE=DBRJNI.cpp

$(TARGET): $(OBJECT)
	$(CC) -shared -o $(TARGET) $(OBJECT) $(LDFLAGS) $(DBRLIB)
	$(shell sudo ln -s ~/Dynamsoft/BarcodeReader4.0/Redist/$(LIBNAME) /usr/lib/$(LIBNAME))

$(OBJECT): $(SOURCE)
	$(CC) $(CCFLAGS) -I$(JNI_INCLUDE) $(SOURCE)
#DBRJNI.h :
#	javah -o DBRJNI.h -classpath $(CLASS_PATH) com.dynamsoft.DBRJNI

# the clean target
.PHONY : clean
clean:
	sudo rm -f $(OBJECT) $(TARGET) /usr/lib/$(LIBNAME)
If you don’t use the command $(shell sudo ln -s) to creates a symbolic link, you will see the following error:
/usr/bin/ld: cannot find -lDynamsoftBarcodeReaderx64
Build libdbr.so with make:
In order to correctly load the shared library that generated under the jni folder, specify the VM arguments in Run Configurations:
-Djava.library.path=jni

Test the Java barcode program with a few lines of code:
                static {

                                System.loadLibrary("dbr");

                }

                public native int initializeLicense(String license);

                public native ArrayList<BarcodeResult> readBarcode(String fileName);

                public static void main(String[] args) {

                                // invoke the native method

                                DBRJNI barcodeReader = new DBRJNI();

                                int ret = barcodeReader.initializeLicense("<DBR License>");

                                System.out.println("Initialize license: " + ret);

                                barcodeReader.readBarcode("<Image File>");

                }

Source Code
https://github.com/dynamsoftsamples/java-barcode-reader-for-linux